Bringing Korean Flavors Home: Easy Galbi-jjim! 🍖 Have you always thought Galbi-jjim was too complicated? Now, even if you’re living abroad, you can easily follow our detailed recipe and pro tips. Make this warm and delicious Korean braised short ribs dish yourself!
Hello everyone! Do you love Korean food, especially Galbi-jjim? I often miss the taste of Korea while living abroad. Especially during holidays or special occasions, I can’t help but think of the Galbi-jjim I used to share with my family. 😭 Many of you might have hesitated to make it yourself because the process seems so complex. I felt the same way at first! But after making it a few times, I realized it’s not as hard as it looks. Today, I’m going to share my personal Galbi-jjim recipe so that even those of you far away can easily experience the warm taste of Korea at home. 😊
Galbi-jjim: Let’s Start with the Ingredients! 🛒
The most important thing for making delicious Galbi-jjim is fresh ingredients, right? Honestly, it might be challenging to find all the ingredients, especially if you’re not in Korea. So, I’ve put together a list of ingredients that are relatively easy to find abroad. If you can’t find a specific ingredient, check the tip box below for possible substitutions!
| Category | Ingredients (for 4 servings) | Notes |
|---|---|---|
| Main Ingredient | Beef short ribs (for braising) 1kg | Bone-in or boneless ribs are both fine |
| Vegetables | 1/4 daikon radish, 1 carrot, 1 green onion, 1 onion, 3-4 shiitake mushrooms | Chestnuts, jujubes are optional |
| Sauce (standard) | 100ml soy sauce, 2-3 tbsp sugar, 2 tbsp minced garlic, 1 tbsp sesame oil, 1/2 tbsp minced ginger, pinch of black pepper | 50g grated pear/apple (optional), 2 tbsp cooking wine (mirin) |
| For Odor Removal | 2-3 bay leaves, pinch of whole black pepper | 1 tbsp instant coffee or 1 green tea bag |
💡 Good to Know! Substitutions & Tips
- Grated Pear/Apple: This tenderizes the meat and adds natural sweetness. If unavailable, you can use pear juice or apple juice!
- Cooking Wine (Mirin): Helps remove the gamey smell from meat. A small amount of white wine or soju can also work.
- Adjusting Sugar: The saltiness of soy sauce varies by brand, and sweetness is a matter of personal preference. It’s best to add a little at first and adjust later.
- Finding Korean Ingredients: Look for Asian grocery stores or online Korean food retailers. (Click here for common Korean ingredient suppliers abroad)
Time to Cook Galbi-jjim! Feel Like a Chef 🧑🍳
Alright, now that the ingredients are ready, shall we start making Galbi-jjim? It’s not difficult at all if you follow these steps carefully! I’ll also share some tips I learned from my own experience along the way.
- 1. Remove Blood from Ribs (Very Important! 🩸):Soak the beef short ribs in cold water for about 2-3 hours to remove blood. It’s even better if you change the water 2-3 times during this process. I usually soak them in the morning before I start cooking. Properly removing the blood is crucial for a clean taste without any gamey smell from the ribs!⚠️ Caution!
Blood removal is a critical step that determines the taste of your Galbi-jjim. If you rush it, the meat might have an unpleasant smell, so please take your time and soak them thoroughly! - 2. Blanch the Ribs (Secret to Tenderness! ♨️):After draining the blood, blanch the ribs in boiling water with bay leaves and whole black pepper (or coffee/green tea bag) for about 10 minutes. This helps remove any remaining odors and slightly tenderizes the meat, allowing the sauce to absorb better. Rinse the blanched ribs under cold water to remove impurities and cut them into bite-sized pieces. I usually cut between the bones for bone-in ribs, or into 1-inch pieces for boneless ribs.
- 3. Make the Galbi-jjim Sauce (No Golden Ratio! 🌟):Now it’s time to make the sauce! Just mix all the ingredients I listed earlier. Adding grated pear or apple enhances the natural sweetness and flavor. I sometimes blend onion and pear (or apple) first, then strain it through a sieve to use only the juice. This makes the sauce very clean! Mix soy sauce, sugar, minced garlic, sesame oil, minced ginger, and black pepper well. It’s important to taste as you go and adjust the sugar and soy sauce to your personal preference.Finding Your Own Sauce Ratio 📝Honestly, there’s no “golden ratio.” Everyone’s taste is different, and even soy sauce brands vary in saltiness. I usually start with the recipe, then taste it. If I feel like “Hmm… something’s missing 2%,” I add a little more soy sauce, or if I need more sweetness, I use honey or corn syrup instead of sugar. It might seem like a small detail, but these minor adjustments can really transform the taste of your Galbi-jjim!
- 4. Prepare Vegetables & Marinate Ribs (Colors Matter! 🥕):Cut the daikon radish and carrots into large, bite-sized pieces and round off the edges. (This is called “rounding the edges,” and it helps the vegetables maintain their shape and not break apart during braising.) Cut the onion and green onion into large pieces too. Place the prepared vegetables and blanched ribs in a large bowl, pour in the prepared sauce, and mix well. I recommend marinating for at least 30 minutes to 1 hour. The longer it marinates, the better the flavor will absorb into the meat!
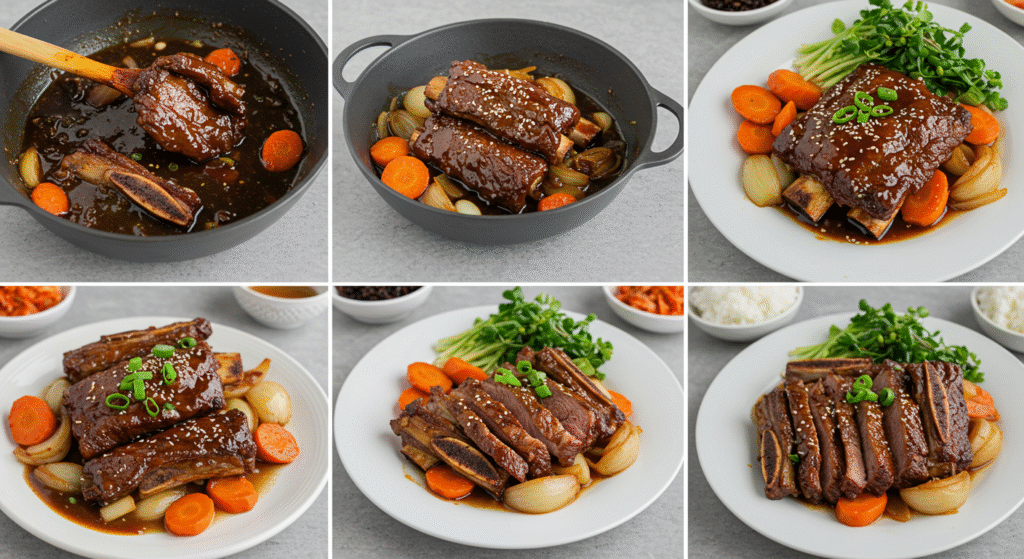
- 5. Braise Thoroughly (Requires Patience! ⏳):Transfer the marinated ribs and vegetables to a pot, and pour in enough water to just cover the ribs. Bring to a boil over medium heat, then reduce to low heat, cover, and braise for at least 1 hour. It’s important to cook until the meat is tender. If the liquid reduces too much, add a little more water and stir occasionally to prevent burning. I sometimes use a pressure cooker, which makes the meat tender much faster!
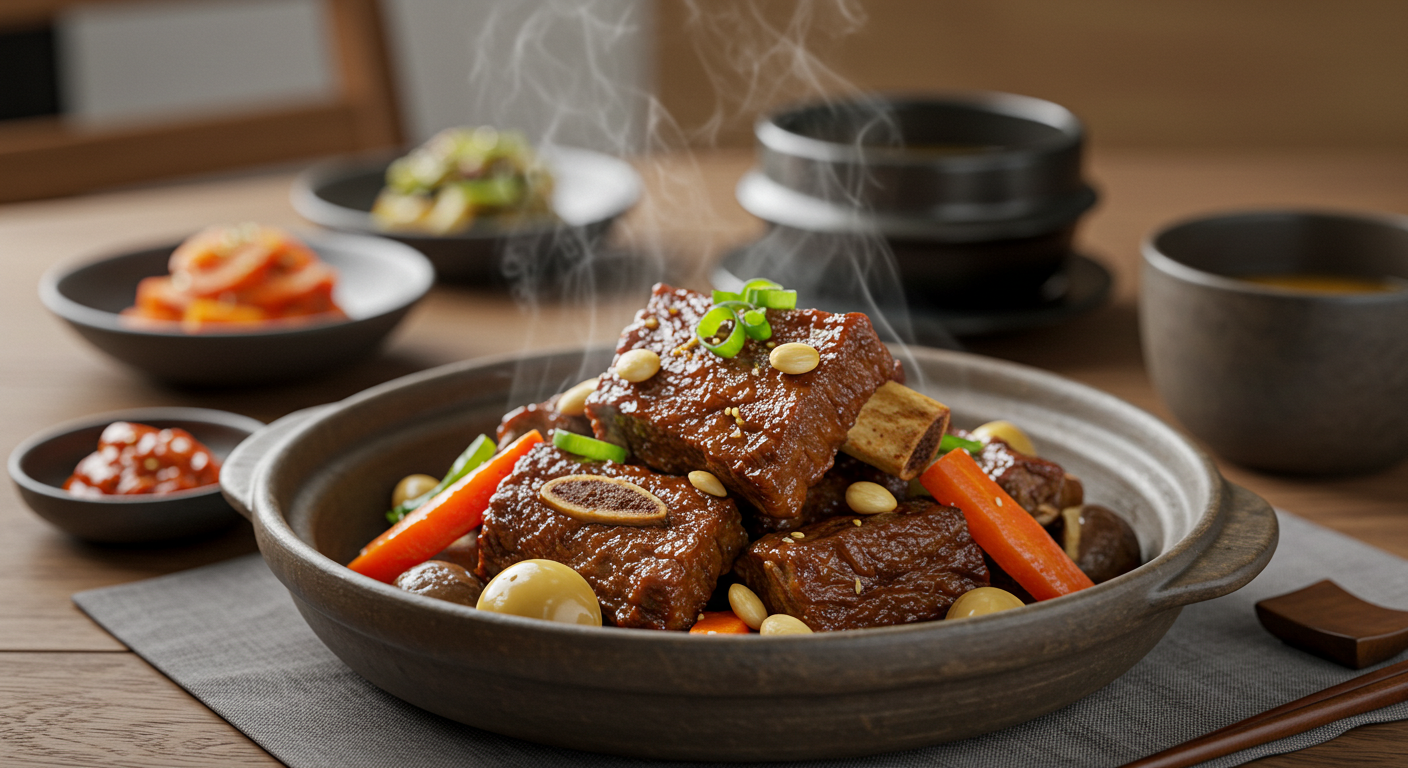
- 6. Finishing Touches (Excitement Before Completion! ✨):Once the meat is tender enough, finely chop some green onions and drizzle a little sesame oil. And voilà, your Galbi-jjim is complete! I sometimes top it with pine nuts or ginkgo nuts for a more refined look. Served with warm rice, it’s truly a “rice thief” (meaning it makes you eat a lot of rice)! 👍
Galbi-jjim Success Checklist! 📝
Let’s go over the key points for successful Galbi-jjim one more time. Remembering these will significantly reduce your chances of failure! (Jump back to cooking steps)
💡
Essential Elements for Galbi-jjim Success!
1. Blood Removal: Minimum 2 hours, change cold water frequently! This is the start of a clean-tasting Galbi-jjim.
2. Blanching: Removes impurities and tenderizes meat! Bay leaves and whole black pepper are essential.
3. Sauce Adjustment: The golden ratio is according to your taste! A sense of adding more while tasting is key!
4. Braise Thoroughly: Patience until the meat is tender! Use a pressure cooker to save time!
5. Rounding Vegetable Edges: A dish that looks good tastes good too! Prevents vegetables from breaking apart during braising.
Remember these 5 tips, and you’re already a Galbi-jjim master! ✨
Frequently Asked Questions ❓
Q: What cut of meat should I buy for Galbi-jjim?
A: 👉 You can usually buy beef short ribs pre-cut for braising. Both bone-in and boneless options are fine. Bone-in ribs tend to have a deeper flavor but might be more cumbersome to prepare.
Q: How long should I marinate the meat?
A: 👉 A minimum of 30 minutes to 1 hour is good. If you have enough time, marinating in the refrigerator for 2-3 hours or even overnight will allow the sauce to penetrate deeper into the meat, making it more delicious!
Q: What if my Galbi-jjim turns out too sweet or too salty?
A: 👉 If it’s too sweet, add a little more water or kelp broth and continue to simmer. If it’s too salty, you can add boiled potatoes or daikon radish and simmer together; they will help neutralize the saltiness. Using honey or corn syrup instead of sugar might make it easier to control the sweetness.
How was it? Not as hard as you thought, right? 😅 Rather than trying to make it perfect from the start, I hope you enjoy the process of experimenting and finding your own “golden recipe.” A warm bowl of Galbi-jjim will surely fill your heart! If you have any questions while cooking, please feel free to ask in the comments below~ 😊
-
Pingback: Master Kimchijeon: From Using Sour Kimchi to Enjoying It Perfectly! - dailysmartpick.com